案例

目前行业中普遍采用的解决方案是通过网络方式安装并结合自动应答文件,实现无人值守自动化安装部署操作系统。这种安装方式需要我们配置至少一台服务器,所有需要安装系统的客户端通过网络 的方式连接服务端启动安装程序,在根据服务器中存放的自动应答文件实现大规模自动自动安装部署系统。整体拓扑如下:

这种无人值守的解决方案需要提前部署一台包含DHCP、TFTP,NFS等服务器。

安装部署的流程为:客户端首先需要在BIOS中设置通过网络启动,当客户端启动后,就会通过发送广播包的方
式寻找DHCP服务器,如果找到了DHCP服务器,即可向该服务器申请获得包括IP地址在内的网络参数,并通过
DHCP获得TFTP的位置,当客户端获得TFTP服务器的地址后,即可从TFTP服务器上将启动文件下载到本机内
存并且运行,最终实现无盘启动的功能。
可以在启动文件中设置Kickstart文件共享的位置,这样客户端启动后,即可自动寻找kickstart文件实现
无人值守安装操作系统。注意,kickstart文件需要实现通过网络共享。在kickstart文件中描述了如何安
装设置操作系统。运行部署脚本等。

1、PXE介绍

PXE是由Intel公司开发的基于客户端/服务器模式的一种技术,其核心功能是让客户通过网络从远端服务
器下载启动镜像,从而实现网络启动。整个过程中,客户机要求服务器分配IP地址,在使用TFTP协议下
载位于服务器上的启动镜像到本机内存中并执行,由这个启动文件完成客户端基本软件的设置。

2、kickstart技术

kickstart安装是目前主要的一种无人值守自动部署安装操作系统的方式,使用这种技术,我们可以很轻
松地实现自动安装和配置操作系统。这种技术核心是自动应答文件(kickstart文件),即将本来在安装
过程中需要我们手动设置的语言、密码、网络参数等通过读取自动应答文件实现自动设置。也就是说,
我们需要事先将对操作系统的设置写入自动应答文件中,开始安装操作系统是,指定安装程序读取自动
应答文件实现自动安装及部署操作系统。
kickstart文件可以通过如下三种方式生成。

(1)手动书写(仅需要一个文本编辑工具即可)。
(2)通过system-config-kickstart图形工具。
(3)通过红帽的安装程序Anaconda自动生成。

3、配置安装服务器

PXE安装流程

3.1 DHCP服务

DHCP服务器主要实现在企业内部网络为客户端分配IP地址等网络参数。在我们的无人值守环境中,当
客户端选择从网络启动后,就会通过发送广播数据包的形式寻找DHCP服务器,从DNCP获得IP地址等参
数后才可以通过TFTP共享读取启动文件。

1
[root@localhost ~]# yum -y install dhcp

安装后,DHCP服务的主配置文件为/etc/dhcp/dhcp.conf.我们可以修改配置文件以实现为客户端分配
网络参数。

1
2
3
4
5
6
7
8
9
10
11
12
13
14
15
16
17
18
19
20
21
22
23
24
25
26
27
28
29
拷贝配置文件
[root@localhost dhcp]# cd /usr/share/doc/dhcp-4.2.5/
[root@localhost dhcp-4.2.5]# ls
dhcpd6.conf.example dhcpd.conf.example ldap
[root@localhost dhcp-4.2.5]# cp dhcpd.conf.example /etc/dhcp/
修改配置文件
[root@localhost dhcp-4.2.5]# cd /etc/dhcp/
[root@localhost dhcp]# cp dhcpd.conf dhcpd.conf.bak
[root@localhost dhcp]# mv dhcpd.conf.example dhcpd.conf

[root@localhost dhcp]# vim dhcpd.conf
# dhcpd.conf
#
# Sample configuration file for ISC dhcpd
#
# option definitions common to all supported networks...
log-facility local7;
# A slightly different configuration for an internal subnet.
subnet 192.168.79.0 netmask 255.255.255.0 { #指定为那个网段分配网络参数
range 192.168.79.3 192.168.79.100; #设置准备为客户端分配的IP地址
option domain-name-servers centos7.expample.com; #设置分配给客户端的DNS服务器地
址。
option routers 192.168.79.2; #设置分配给客户端的网关地址。
default-lease-time 600; #
max-lease-time 7200;
next-server 192.168.79.171 #TFTP服务器地址
filename "pxelinux.0"; #在TFTP服务器上共享的启动文件

}

3.2 TFTP服务

TFTP服务为客户端提供一种简单的文件共享,他不具备向FTP那样丰富的功能,不过由于简单的设计,
TFTP非常适用于传输小且简单的PXE启动文件。

1
2
3
4
5
6
7
8
9
10
11
12
13
14
15
16
17
18
19
20
21
22
安装TFTP:
[root@localhost ~]# yum install tftp-server -y
修改配置文件
[root@localhost ~]# vim /etc/xinetd.d/tftp
# default: off
# description: The tftp server serves files using the trivial file transfer \
# protocol. The tftp protocol is often used to boot diskless \
# workstations, download configuration files to network-aware printers, \
# and to start the installation process for some operating systems.
service tftp
{
socket_type = dgram
protocol = udp
wait = yes
user = root
server = /usr/sbin/in.tftpd
server_args = -s /var/lib/tftpboot
disable = yes #打开禁用状态
per_source = 11
cps = 100 2
flags = IPv4
}

3.3 FTP服务

FTP是file Transfer Protocol的简写,及文件传输协议。目前市面上有很多可以实现FTP协议的软件,
vsftp就是一种利用FTP协议进行数据共享的软件,vsftp主要特色就是提供一种安全的数据共享服务。我
们可以使用它作为Centos系统文件的共享服务平台,当客户端从网络从网络启动正式进入到安装界面
后,还需要读取Centos光盘中的系统文件,已完成最后的安装。这些文件就通过vsftp共享给网络用
户。

1
2
3
[root@localhost ~]# rpm -q vsftpd
未安装软件包 vsftp
[root@localhost ~]# yum install vsftpd

4、自动化安装实例

4.1主机规划

IP 服务
192.168.79.171 DHCP、TFTP、FTP

初始化系统环境:

1
2
3
4
5
6
[root@localhost ~]# systemctl stop firewalld
[root@localhost ~]# systemctl disable firewalld
[root@localhost ~]# sed -i.bak 's/=enforcing/=disabled/' /etc/sysconfig/selinux
[root@localhost ~]# sed -i.bak 's/=enforcing/=disabled/' /etc/selinux/config
[root@localhost ~]# setenforce 0

创建安装目录结构:

1
2
3
4
[root@localhost ftp]# cd /var/ftp/
[root@localhost ftp]# mkdir centos7u4
[root@localhost ftp]# cd /var/lib/tftpboot/
[root@localhost tftpboot]# mkdir centos7u4

4.2 配置DHCP

修改配置

1
2
3
4
5
6
7
8
9
10
11
12
13
14
15
16
17
[root@localhost dhcp]# vim dhcpd.conf
# dhcpd.conf
#
# Sample configuration file for ISC dhcpd
#
# option definitions common to all supported networks...
log-facility local7;
# A slightly different configuration for an internal subnet.
subnet 192.168.79.0 netmask 255.255.255.0 {
range 192.168.79.3 192.168.79.100;
option domain-name-servers centos7.expample.com;
option routers 192.168.79.2;
default-lease-time 600;
max-lease-time 7200;
next-server 192.168.79.171 ;
filename "pxelinux.0";
}

启动服务

1
2
3
4
5
6
7
[root@localhost tftpboot]# systemctl start dhcpd
[root@localhost tftpboot]# systemctl enable dhcpd
Created symlink from /etc/systemd/system/multi-user.target.wants/dhcpd.service to /usr/lib/systemd/system/dhcpd.service.
[root@localhost tftpboot]# netstat -ntplu |grep 67
udp 0 0 0.0.0.0:67 0.0.0.0:* 116439/dhcpd
udp 0 0 0.0.0.0:67 0.0.0.0:* 2932/dnsmasq

4.3 配置TFTP服务器

1
2
3
4
5
6
7
8
9
10
11
12
13
service tftp
{
socket_type = dgram
protocol = udp
wait = yes
user = root
server = /usr/sbin/in.tftpd
server_args = -s /var/lib/tftpboot
disable = no
per_source = 11
cps = 100 2
flags = IPv4
}

安装tftp的动态管理工具
tfpt是被xinetd动态管理的服务,所以我们需要同时连接xinetd一起安装,后面的操作中,启动服务,
只需要启动xinetd即可。

1
[root@localhost dhcp]# yum install xinetd

将客户端所需要的启动引导文件复制到TFTP服务器

1
2
3
[root@localhost dhcp]# yum install syslinux      通过该软件包获取引导文件
[root@localhost dhcp]# cp /usr/share/syslinux/pxelinux.0 /var/lib/tftpboot/
将镜像放在光驱并运行如下命令,从光盘中复制启动镜像文件和启动配置文件到TFTP共享目录。

创建镜像目录

1
2
3
4
5
6
7
8
9
10
11
12
13
14
15
16
17
18
19
20
21
22
23
24
[root@localhost ~]# mkdir -p /iso
[root@localhost /]# cd iso/

上传镜像至/iso目录下
[root@localhost iso]# ls
CentOS-7-x86_64-Everything-1810.iso

[root@localhost centos7u4]# mount -o loop -t iso9660 /iso/CentOS-7-x86_64-Everything-1810.iso /var/ftp/centos7u6
mount: /dev/loop0 写保护,将以只读方式挂载
[root@localhost isolinux]# ls
boot.cat boot.msg grub.conf initrd.img isolinux.bin isolinux.cfg memtest splash.png TRANS.TBL vesamenu.c32 vmlinuz
[root@localhost isolinux]# pwd
/var/ftp/centos7u6/isolinux

[root@localhost isolinux]# cp /var/ftp/centos7u4/isolinux/vesamenu.c32
/var/lib/tftpboot/
[root@localhost isolinux]# cp /var/ftp/centos7u4/isolinux/vmlinuz
/var/lib/tftpboot/centos7u4/
[root@localhost isolinux]# cp /var/ftp/centos7u4/isolinux/initrd.img
/var/lib/tftpboot/centos7u4/

[root@localhost isolinux]# mkdir /var/lib/tftpboot/pxelinux.cfg
default放入.
[root@localhost dhcp]# chmod 644 /var/lib/tftpboot/pxelinux.cfg/default

修改启动配置文件

1
2
3
4
5
6
7
8
9
10
11
12
13
14
15
16
17
18
19
20
21
22
23
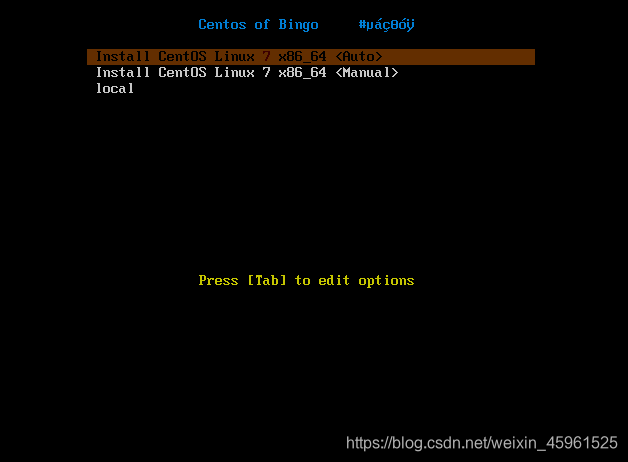
vim /var/lib/tftpboot/pxelinux.cfg/default
default vesamenu.c32
timeout 60
display boot.msg
menu background splash.jpg #背景,可以自己改,但尺寸要把握好
menu title Centos of Bingo #标题

label centos7 64 <Auto Installation>
menu label Install CentOS Linux ^7 x86_64 <Auto>
kernel centos7u6/vmlinuz
append initrd=centos7u6/initrd.img inst.stage2=ftp://192.168.79.171/centos7u6
inst.repo=ftp://192.168.79.171/centos7u6 inst.ks=ftp://192.168.79.171/centos-7-ks.cfg

label centos7 64 <Manual Installation>
menu label Install CentOS Linux ^7 x86_64 <Manual>
kernel centos7u6/vmlinuz
append initrd=centos7u6/initrd.img inst.stage2=ftp://192.168.79.171/centos7u6

label local
menu default menu label Boot from ^local drive
localboot 0xffff
menu end

启动服务

1
2
3
4
5
[root@localhost pxelinux.cfg]# systemctl restart xinetd.service
[root@localhost pxelinux.cfg]# systemctl enable xinetd
[root@localhost pxelinux.cfg]# ss -ntplu |grep 69
udp UNCONN 0 0 *:69 *:* users:(("xinetd",pid=3131,fd=5))

4.3 创建自动应答文件

注意: 虚拟机需安装图形化,未安装的话乱码,建议在安装了图形化的的虚拟机生成,然后拷贝使用

首先安装system-config-kickstart图形工具,在终端命令行输入:

1
2
[root@localhost ~]# yum install system-config-kickstart
[root@localhost ~]# system-config-kickstart

查看ks文件

1
2
3
4
5
6
7
8
9
10
11
12
13
14
15
16
17
18
19
20
21
22
23
24
25
26
27
28
29
30
31
32
33
34
35
36
37
38
39
40
41
42
43
44
45
46
[root@localhost ~]# cat ks.cfg
#platform=x86, AMD64, 或 Intel EM64T
#version=DEVEL
# Install OS instead of upgrade
install
# Keyboard layouts
keyboard 'us'
# Root password
rootpw --iscrypted $1$JoUhw4BT$/G6kcw2tEbOrfqY2DxywO.
# Use network installation
url --url="ftp://192.168.79.171/centos7u6"
# System language
lang zh_CN
# System authorization information
auth --useshadow --passalgo=sha512
# Use text mode install
text
# SELinux configuration
selinux --disabled
# Do not configure the X Window System
skipx

# Firewall configuration
firewall --disabled
# Reboot after installation
reboot
# System timezone
timezone Asia/Shanghai
# System bootloader configuration
bootloader --location=mbr
# Clear the Master Boot Record
zerombr
# Partition clearing information
clearpart --all --initlabel
# Disk partitioning information
part /boot --fstype="xfs" --size=200
part swap --fstype="swap" --size=1000
part / --fstype="xfs" --grow --size=1

#下面的内容为手动添加编写的内容,以%packages开始。%end结尾,中间是需要安装的软件包或者软件包组
的名称这里我们安装core和base这两个包租
%packages
@base
net-tools
@core
%end

检查有无语法错误

1
[root@localhost ~]# ksvalidator ks.cfg

将ks文件移动到/var/lib/tftp下

1
[root@localhost ~]# mv ks.cfg /var/ftp/centos-7-ks.cfg

4.4 测试安装虚拟机

新创建的虚拟机要求内存2G以上,1G会由于内存不足安装失败
打开虚拟机,设置从网络启动。


总结:安装 CentOS7 时,内核加载到dracut-initqueue[629]: curl: (23) Failed writing body后面就一直报错,一会儿以后就与不断地报出dracut-initqueue[691]: Warning: dracut-initqueue timeout - starting timeout scripts地错误。
官方给的解决方案:官方给的解决方案